
I do a whole load of training these days, both as part of my day-job and my freelance work, so have picked up a few small tricks along the way. There's nothing earth-shattering here - but if you run training or teach infolit classes, you may find some of these useful.
Here's the short, visual version - then I go into each one in a bit more detail below.
Session structure
1. Start with something practical. Sometimes there is, unavoidably, a bunch of theory or conceptual stuff you have to get through. But if that's the case, if at all possible make this second on your itinerary for the day / hour - and start off with something practical. Diving in with something for people to DO wakes everyone up, and grounds the whole workshop in something tangible rather than abstract. It also makes everyone into active participants early on.
2. Allow time to recharge. A full-day workshop should have coffee-breaks etc built-in, but even a 1hr workshop can be quite overwhelming. Just building in a 3 minute gap for participants to switch-off, chat to each other, relax, will help them focus for the second half of the session and raise the energy level all round. A break 10 minutes in to a 1hr session works brilliantly - surprisingly better then, than half-way through the session or later.
3. Sum up via a Random Slide Challenge (also known as Battle Decks). I love a random slide challenge. Here's how it works:
- You create a short simple slide-deck which summarises the session you've just run (I normally create two decks of 5 slides each)
- You get participants to deliver the presentation (so in my case, two volunteers)
- The volunteers have never seen the slides before, which is part of the fun - so they see each slide for the first time at the same moment the audience does, and have to improvise their presentation based on that
- You move the slides along after 15 seconds per slide, so the whole thing takes only just over a minute per presentation
You have to give them the best possible chance of knowing which part of the session each slide is getting at! If you look at slide 41 onwards of the deck embedded here, you'll see an example of a random-slide challenge set of slides.
This works well for two reasons - firstly it is often hilarious. People in the audience shout-out if they pick up on what the slide is about before the presenters, and basically it leaves everyone on a high at the end of the session. Feedback forms at both the British Library, where I've done this on training courses, and for my infolit classes at York, often point towards this as being one of the delegates' favourite parts. The other reason it works is it's often a surpisingly great summary of the session. People say the exact kinds of things I would have said if I was summarising myself, but it has more impact because it's another voice (and, with students, it's one of their peers). Try it! The only thing is, you need a plan B for if you get no volunteers, which once happened to me. Prizes help ensure this doesn't happen...
4. Close after the questions. It's good to end any training or teaching session with a call to action - a clear message as to where participants can go from here. This can be somewhat muddied by a Q&A session (which can of course throw up anything), so build in time for questions just before the end, and leave yourself the last 5 minutes to close the session with something direct and meaningful.
Tablet as teaching assistant
5. Use Padlet on your tablet to remember who's who. Padlet is a great tool that can be used in all sorts of ways. You create an online wall, onto which you and anyone else who has the URL can post notes. Anyone can double-click anywhere to add a sort of virtual post-it. Then they can put in their name as the title, and a note, or a URL - links to pics or videos become embedded objects on the wall. I use it to crowd-source people's ideas in training sessions - like you'd use a flipchart, except everyone can go back and look at the URL after the session, and it becomes a sort of archive for everyone to learn from oneanother.
Anyway, depending on the session I'll go round at the start and ask people to introduce themselves, and say what they want to get out of the day / hour. This is very useful in and of itself, as you can tailor things accordingly. I'll type it into Padlet on the big presenting screen as I go, so we can all refer back to it later in the day and see if we did what we said we'd do! But the really useful thing is, you can choose exactly where your notes go on the screen - so I put the notes in a way which corresponds to the physical layout in the room and where people are sitting, like in the example below. Then when I take it off the big-screen to put my slides up, I put the Padlet wall on my ipad screen - this means I've got everyone's names in the right place for easy reference so I can remember who's who!
(I feel like I didn't explain that very well. Does that make sense? The example below should clear it up.)
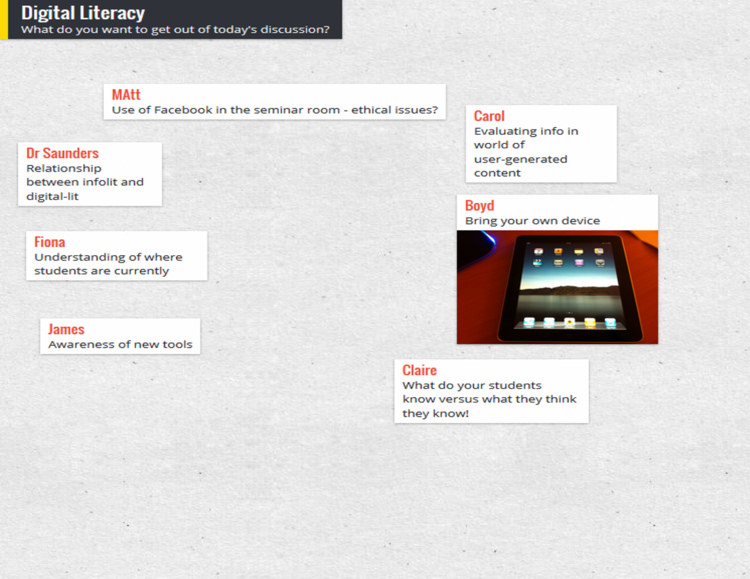
A Padlet wall example
6. Skip ahead in the presentation, on your tablet. I like to have my slides or prezi open on my ipad so I can see what's coming. This is particularly handy if you're joint-teaching with somone - while they're speaking, you can recap what you're supposed to be saying next. A massive part of successful teaching and presenting, for me, is feeling in control - and this helps.
Handouts
7. Hand out the handouts. It's tempting to feel more organised by distributing the handouts, if you use them, before people arrive. Placing one by each PC or on every table. But if the group is of 20 or less, hand them round yourself; it's a great opportunity to meet each person individually and make eye-contact which, however brief, makes the communication easier and fuller for the session proper.
8. Use screengrabs to make exercises easy to find. It's amazing how often people lose their place in a handout. When you get to an excercise in the handout, put a screengrab of the slide that's on the big-screen at the time you're introducing the excercise - it makes it quick and easy for people to know exactly where they should be.
Materials
9. Use a free PBworks wiki to store materials for delegates. For all sorts of reasons, it's good to have materials online. Particularly if your session is link-heavy, store a digital copy of the hand-out on a free wiki (PBworks for example) so delegates can access them that way and just click on URLs rather than typing them in. Put the PowerPoint on there too - this means you’ll have a copy of your presentation and hand-outs even if your USB stick falls out of your pocket and your printer breaks…
10. Send the presentation round afterwards with an email. A follow-up email is useful for reinforcing key messages, and making sure people have access to the presentation materials. Don’t rely on people (students especially) tracking it down for themselves; follow up directly, ensuring they have a copy of the presentation AND your contact details. If there are issues around attachment filesizes, upload your slides to Slideshare and your hand-out to Scribd, and include links instead.
As always, I'd welcome comments - add your own tips below and help make this post more useful!