prezi guide

Prezi Guide: The 5 Essentials To Stop Your Audience Feeling Sick


Prezi is nothing if not divisive. Some people love it, some people hate it - I'm in neither of those camps. I find it very useful in some situations, but still use good old fashioned PowerPoint Slides for more than half the presentations I give. Prezi should be used for a reason.

Prezi is relatively new (it's been around since 2009), it's getting more popular (there are around 40 million users now) and it's improving its interface all the time. Some people accuse it of being style over substance, but for certain ideas (interactive maps, for example) it provides substance that slides simply can't bring to the table. For me, Prezi can be fantastic as long as you adhere to one maxim above all: don't let the medium get in the way of the message. Any presentation materials should be there to support the presenter and work FOR the audience in adding to their experience. Do that, and Prezi can really raise the level of an audience's engagement.

Potentially, a great Prezi has the wow factor. So why would you want to completely undermine that by creating something which makes sections of your audience feel motion-sickness? It's up to you, the presenter, to minimize the possibility of this as far as humanly possible. Here's how. (For the short version, view the Prezi about it.)

1. Positioning

The single most important thing about creating a Prezi is the positioning of the objects on the canvas (and directly related to this, the order in which they're visited on the path). Position your materials sympathetically, people! By which I mean, rather than moving haphazardly around the canvas and disorientating the viewer, move from left to right, or from top to bottom - move in a way the human brain is used to.
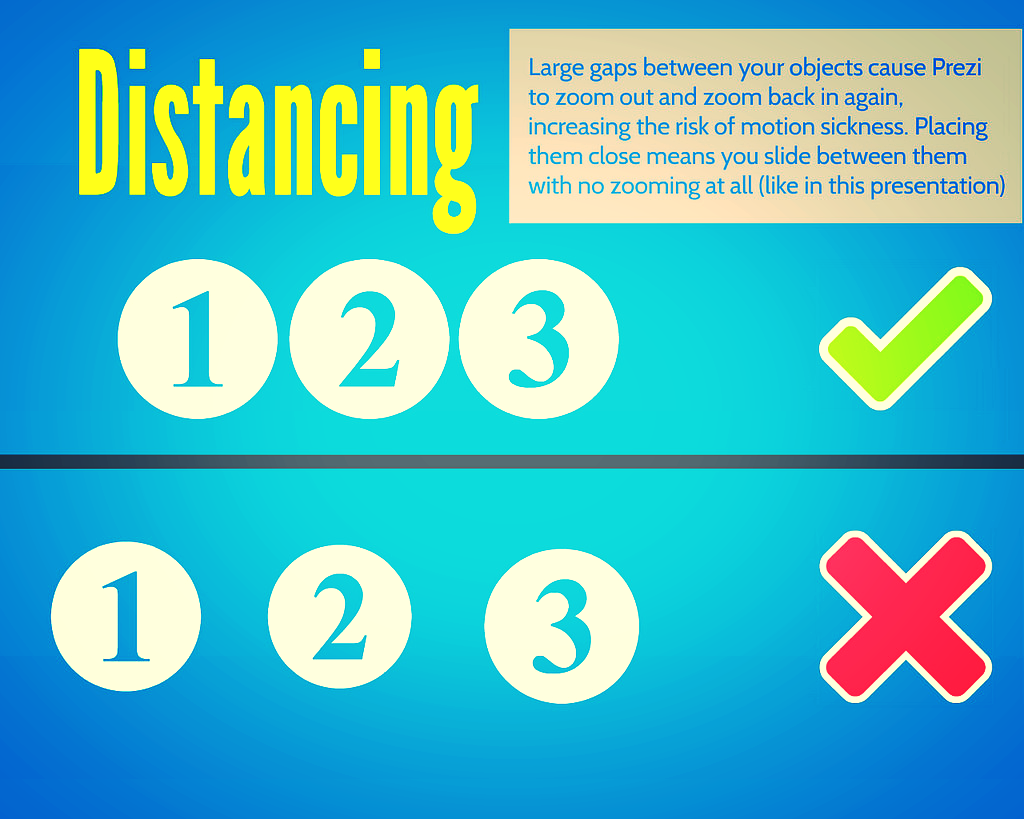
2. Distancing

But positioning is about more than putting your objects in a coherent pattern - it's about having a uniform (and short) distance between them. The closer you place your objects together, the less zoom and swoop there is in your prezi. Place them right next to each other and it won't zoom out at all, it will just slide right over from one object to the next.

3. Sizing

As with distancing, uniformity is the key to sizing too. Put similarly sized objects together - ideally make them the exact same size. This means there's no need to zoom in or out. Contrast this to having a small object followed by a much larger object and then a small object again: the zoom is flying all over the place.

4. Rotation

99.9% of rotations and barrel-rolls in Prezis add absolutely zero value to the presentation.

I just made that stat up but I'm sure it's true. In fact most of the time rotating actively detracts from a Prezi. It is the Number One cause of queasyness in the viewer. It can be used with a good reason (a visual metaphor of some kind to better express your ideas) but otherwise, why would you? It just gets in the way of your message.

5. Pacing

The ability to zoom in and out is both Prezi's strength and its weakness. It's what allows you to show the relationship between objects on your presentation, it's what allows the element of surprise for the big reveal, it's what lets you put your own hierachy onto your information rather than having it dictated to you. But it's also at the heart of what can induce nausea in your audience.

So, pace your Prezi like you would regular slides. Don't move it on every few seconds - arrive at point on your path, talk about it for two minutes, or five minutes, or more, and then move on. This means there are fewer zooms per presentation, and less quickly following one-another. But you can still take advantage of the zoom's ability to enhance your presentation.


One last note on zooming

If you double-click the right arrow to move your presentation on (or left arrow to move it back) it zooms twice as fast. This can be effective in reducing the sea-sick effect - after all it's the transitions which cause the problems, so if you only transition for 50% of the time you did before, that helps. The only downside is it feels risky; if you triple click by mistake, you'll miss your path point entirely and have to go back...

Here's my Prezi on this whole topic - it explains what I've just said in a visually illustrative way (which is sort of the point of Prezi after all):


Finally

All that said, if members of your audience are particularly susceptible to motion-sickness, even doing ALL of the above may not be enough. So only use Prezi for a specific reason. Use it to do something PowerPoint can't, rather than as a direct replacement for the sake of it. Use it to cover several dispirate topics, or to make something interactive, or to visually explain relationships between ideas. But if you don't need to do any of those things, and it's a regular presentation, just use regular slides. Just be sure to use them well.

Which leads us to a bonus option:

(6. The nuclear option)

Prezi can be a very useful way to make a nice looking presentation: the fonts, icons, ease of importing images, and themes, make smart presentation materials without the need for a huge amount of effort or design knowledge. Once you get over the initial learning curve, it's quicker to make a nice Prezi than nice slides. So if you want to take advantage of all that, but want to 100% eliminate the possibility of motion-sickness, simply save your Prezi as a PDF, and use it as you would slides. Every path point on your Prezi is a full-page of the PDF so it ends up looking like a (nice) PowerPoint.

To save a Prezi as a PDF, click the share icon and choose the relevant option from there.

To save a Prezi as a PDF, click the share icon and choose the relevant option from there.


Disclaimer: Prezi will always make some people sick - they dislike Prezis intensely, and it's very important to them that they bring this up a lot. I offer no judgement here; I do the same with LinkedIn. But this guide is about stopping an audience feeling motion-sickness when watching a Prezi - if you aren't prepared to take steps to do this, you shouldn't be making Prezis!

6 useful things Prezi can do (which even experienced users miss)

I keep discovering new things about the presentation software Prezi. Asking around, it seems lots of other users didn't know about some or all of these either, so with that in mind I thought I'd draw your attention to 6 useful things. Got any more? Leave them in a comment...

1. Upgrade to the educational licence for free if you are a student or work for a University

All you need to do is go to Upgrade on the Prezi site, and stick in your university email address (.edu or .ac.uk etc). As a result of the upgrade you get more storage space (quite useful), the ability to substitute the Prezi logo for one of your own (could be useful for institutional branding of Prezis) and the ability to keep Prezis private (very useful, particularly from a teaching point of view - you don't want students to see the presentation until it's ready!). Well worth doing, I think.

The upgrade box is at the bottom of the screen

2. Hold down shift when drawing frames and hidden frames to maintain a perfect 4:3 aspect ratio (trust me, this one is REALLY useful!)

This is completely brilliant. I use LOADS of hidden frames in my Prezis, to ensure the viewer is shown exactly what I want them to see in the order I want them to see it. However, when you draw a frame or hidden frame which isn't the (usually 4:3) aspect ratio you're using to present - in other words, when the frame isn't the same shape & proportions as a monitor or projector screen - then other stuff can creep into the frame and slightly ruin all the careful planning.

By pressing shift before drawing a frame, it keeps a perfect 4:3 aspect ratio as you draw it - moving the mouse simply increases or decreases the size, but the shape stays the same. You can in effect create several screens, and populate the screens with content knowing that everything will fit perfectly when you're presenting or when people are viewing the presentation online. I used this technique loads in the new technologies Prezi and the branding Prezi I recently created. The result is: better looking, more cohesive prezis.

An example of hidden frames using 4:3 aspect ratio

3. Save your Prezi to a USB stick

I realise most of you will know this one, but I wrongly assumed it was an 'upgraded licence only' option for ages, so thought I'd flag it up here. It's very much worth doing because a: you aren't relying on an internet connection, b: if you've got embedded YouTube videos (and there is an internet connection) they'll still play and c: it enables you to use a clicker to move the presentation along without having to stand by the PC and use a mouse or the keyboard - you can't use a clicker with a web-based Prezi, for some reason.

When you click 'download' you get a ZIP file - you can extract the ZIP to a USB stick but make sure you take all the files and folders with you, as you need all of them to play the Prezi back. You can't edit it on the stick, so make sure it's your final version before you download it.

Screengrab showing the download button

4. Print your Prezi in an actually quite useful way

Pressing 'print' in edit mode saves the Prezi to a PDF - each page of the PDF is a 'screen' on Prezi (i.e each number on your path becomes a printed screenshot). Again, I'd not previously realised this worked so neatly. It means that, for example, for teaching, you could set a simplified path on your presentation, press print to produce a handout of a reasonable length, then put the path back to the full route again. Also, it's the ultimate back-up - if you can't present your Prezi for some disastrous reason, you can present with the PDF instead.

Screengrab showing the print-preview

5. Import a PowerPoint presentation directly into Prezi

The easiest way to get started with Prezi is probably to import a PPT and mess around with that. If you have slides you wish to convert, just click Insert > PowerPoint and import them onto the canvas - you can choose all or some of the slides, and have Prezi automatically add a path between them if you like. You can edit the text within Prezi - it's not like importing a PDF where you're stuck with what you have.

I'm not sure there's much point in just pulling in some slides and leaving it at that, but it's a nice jumping-off point to creating something more interesting - and it's a lot quicker than typing all the info from your slides in by hand. Quick tip: the more straightforward the slide, the better this works - it struggles with more complicated stuff.

Screengrab showing import slides

6. Choose from more than just 3 colours for your fonts

It used to be the case that you chose your theme, then stuck with the three colours you were given. Now you can change any passage of text to one of a huge number of colour choices - type it first, then the options appear above it on the right.

Picture showing colour highlighting

I hope some or all of these are useful.

A newly updated Ultimate Prezi Guide is here (refreshed in May 2013), and all sorts of related materials are available here.

- thewikiman

The ultimate guide to Prezi


Update: the Prezi itself, below, was updated in May 2013 with some more tips, examples, FAQs, and also to cover the new Prezi interface.

I've been meaning to do this for ages, so here we go: a complete guide to the presentation software Prezi, from what it is and why to use it right up to advanced techniques for making your presentation absolutely killer.

Works best on full-screen, as ever.

I created this for a workshop next week in the library, so I was going to launch it then - but Prezi themselves have started promoting it via their Facebook presence and on their Explore page. (You should really check out the Explore page, some of the Prezis on there are amazing!) So seeing as it's gone global already, I've brought things forward.

I created a hand-out for the workshop, which features screen-grabs of the nuts-and-bolts instructions on how to use Prezi, plus this basic overview for those completely new to it:

The basics

The basic principle of Prezi is to put objects on the canvas and link them together with a ‘path’. Your presentation will then consist of Prezi moving from object to object, zooming in on them in the order you’ve chosen.

Objects can be text boxes, images, youtube videos or graphics. You can write and structure your presentation exactly as you would a PowerPoint, or you can do something completely different.

Just click on the canvas anywhere to start adding stuff.

A typical process of creating a Prezi might consist of these stages:

  1. Plan the structure and outline of the presentation
  2. Add the text, plus any images / videos etc
  3. Move them around and arrange them in a coherent order on the canvas
  4. Plot the path between them in the order you want to use
  5. Click ‘Show’ and watch the presentation back, then refine it if you need to .

If you found this guide useful, I've written a bunch of others to various things like twitter, blogging platforms, netvibes and so on - they can all be accessed here.

Happy presenting!

- thewikiman

How to use Prezi really well

I'm loving using slides to disseminate stuff at the moment, so I've re-written and updated my Prezi FTW post and produced a new top ten tips on creating a great presentation with the online zooming software. Also, I used it as an opportunity to really really hard with the slide-deck and experiment with a slightly different style.   (And put in a little bit of library pride on the final couple of slides.) :)

edit: since these slides were created, Prezi has improved some features and made some changes - including a Theme Editor. This means point 2, about choosing your colour scheme early and the fonts / colours not being mix-and-matchable, is no longer quite as true...

How to use prezi and WIN - feel free to share / use this.

View more presentations from Ned Potter.
For more in-depth information, including a Prezi guide in Prezi itself, see my ultimate guide to Prezi.

Prezi as grand canvas

Since the original Prezi FTW guide I've used Prezi in a new way. Rather than just creating a presentation on a blank background, I've started trying to use an image as the canvas, and superimposing all my text, graphics etc onto that image.

Here is the interactive library map I created for the New Professionals Information Days:

Everything you need to know about technology and working in libraries on Prezi

As you can see it's designed to be used interactively by the viewer, rather than navigated through in linear fashion - everything highlightable is clickable. I think this makes more of the unique properties of Prezi versus PowerPoint - increasingly, I don't think it's worth using Prezi over really nice slides unless you exploit some of these types of capabilities.

In Edit view the Prezi looks  like this:

My Prezi as seen in edit view

All those blue boxes are Hidden Frames, and hidden frames are what makes each bit highlightable (and clickable on). It's really easy to do.

I think this has loads of potential. You could do maps, plans, desks anything with a top down view really. Because Prezi writes directly and transparently on to whatever the surface of the canvas is (as opposed to having to create a text-box with a white or coloured background, for example) you can add text to anything which doesn't already have text on it. So for example you could take the full size version of this picture (from www.sxc.hu):

Some notes arranged on a desk

...and write text of varying sizes on all the little bits of note-paper, making full use of all the different angles, etc etc. You get a nice cohesive top-down view, and then you get to zoom in and read all the intriguing pieces of text individually. Or you could use an old fashioned painting as your canvas (imagine a 19th century oil-painting of a lake) and then zoom in with extreme close-up of some modern water-skiers on there, for some Banksy style anarchy (but subtler)!

So I'd encourage anyone to experiment with the Prezi as Grand Canvas idea. Good luck!

- thewikiman