University of York Library

Instagram guidelines for libraries

After a brief departure last time to mark the 10th anniversary of my becoming a library trainer, this time we’re back to the Instagram Mini Series. Click that link for the previous 3 entries, all of which focus on why to have an account.

Sharing our own Insta guidelines

For this post we’re moving on from the Why to the How. Specifically, how my library - @UoYLibrary on Instagram - does things: an org approached us and asked to share our internal guidance doc with them, and after some discussion amongst ourselves (and a senior manager) to check everyone was comfortable with this, we did so.

At that point we thought why not share them more widely for anyone else who is interested? So here they are - there are some caveats and context below but if you just want to see the doc, this is the doc:

>>> University of York Library’s Instagram Guidelines.

There’s a lot of stats towards the end of this post on the impact adopting these principles has had on our own account, but in short, using these guidelines we’ve increased our Instagram reach by 1149% in 12 months. This stuff really works!

The caveat

This is an internal doc. It’s literally just the guidance I wrote for York staff who help me do the Instagram. So that means it’s not a definitive all encompassing guide! There are probably things we’ve talked about internally which everyone knows, so it’s not codified here. Also, we’re an academic library so it may be skewed towards that sector. Generally speaking though, I think pretty much everything here is applicable to any non-profits using Instagram.

Another small caveat is, I’m not trying to present York’s Insta as the finished article, the account to which everyone should aspire… We’re still learning, still improving, still trying to increase our reach. We don’t nail everything, we still post things people don’t respond to. We’re a work in progress, and this post is really about how to make that progress happen.

The context

Our Instagram was created in 2016 by a Comms Team rather than by us in the library. We finally got control of it ourselves in mid-2017. From that point on it went okay, gradually building up followers and levels of engagement but not setting the world on fire.

From the time of the pandemic starting, I started to spend much more time actively involved in the social media rather than just writing the guidelines, and our Instagram use increased accordingly. We posted a lot more to the Grid, essentially tried harder and, frankly, started to do more of the things I was always telling other libraries to do in social media workshops. It worked well, but it was still very much in the shade of our Twitter account, and not quite hitting the heights we wanted.

Exactly a year ago, I decided that we needed to invest more time in Instagram and make it work better.

Instagram is absolutely essential for reaching undergrads

It is THE communication channel on which to get messages to undergraduates, nothing else comes close. Our Twitter was doing really well and was where we put the most time, and all that time paid off with lots of growth and engagement - but I did some follower analysis and, at least among those who engaged by replying and quote-tweeting us, it was clear that our audience there primarily consisted of PostGrads , Researchers and Academics. So our key social media messages were not getting through to UGs, and Insta is the answer to that problem.

In 2021 I co-presented at an event with Liverpool Uni Library, whose social media really is something of a gold standard in academic libraries, and before the event we chatted on zoom - they had grown their Instagram massively in recent times, which made me think perhaps we could do the same. So I asked my colleague Rebecca Connolly to go on a little fact-finding mission and check out Liverpool, Glasgow and other Uni libraries with good Instagram engagement went about their business and what we could learn. Rebecca produced a brilliant report and we set to work on transforming our Insta into something much more effective for getting key messages out to UGs in particular - a process which is still ongoing.

How we changed our Insta

Some things we tweaked right away, like following more York based accounts, and using Stories a lot more. Using Stories is key and I really feel like it was something I didn’t understand well enough before Rebecca became involved with the account at York; she is an essential part of the progress we’ve made. Stories are so good for newsy items, and the more success you have with Stories the better things seem to go on the Grid too.

Other things evolved over time, like avoiding the use of words and graphics on the grid (only using them on Stories), and making sure to pair big announcements in the captions (NOT the picture) with visually arresting pictures of the library.

If you’ve not read the guidance doc linked at the top of this post, have a look - we basically did all the things in that document! In addition to all that, we’ve created and posted a lot more Reels (you can see all our Reels videos here), and also tried some fancy split photography, that involves dividing a wide-angle shot up into even squares so it can be seamlessly swiped through. Here’s an example of that I posted yesterday which I really like…

The results: our increased Instagram engagement

With any kind of social media, I’m always looking for engagement rather than follower numbers. I want more followers of course - a larger audience of students and staff for our key messages - but they come naturally as a by-product of posting stuff which gets engagement. So for Instagram I’m looking at Likes, Comments, Shares, and Reach, and hoping that if we increase those our followers will increase at the same time.

As it happens, our followers have increased by about a thousand people in the last twelve months. That’s great. More excitingly for me, is that the number of Likes has gone up 42%, despite us posting slightly less frequently overall, so the Likes Per Post has actually gone up 69% - in essence meaning we’re posting stuff the students actually respond to, more of the time. Over 2 years, our total number of Likes have increased by over 350%.

Shares are way up, and Comments also increased which is great because we want that interaction and chance to answer questions - up over 600% over the two years. What isn’t captured by the analytics is the amount of DMs we’ve had - either just messages out of the blue or responses to questions in our Stories. I can’t get figures on this without manually counting but the increase is huge - people love feeding back one-to-one on Instagram.

The reach is the thing that most amazed me though - an increase of over one thousand percent in the 12 months is just fantastic. And the reason is because if people don’t Like your posts, Instagram doesn’t share them widely - so now we’re posting content that gets engagement, a much higher proportion of our followers are seeing our posts. This means our key messages are reaching more undergraduates, and that was the whole aim of this focused attempt to increase engagement.

Like with all social media, the key thing is to learn what your particular community responds best to, and do more of it.

Finally… Do check out Liverpool, they’re so good

So that’s it! There was a lot to get through in this post; if you’ve made this far, I salute you… I hope people find these guidelines useful, and if you have any questions leave me a comment below.

I’ll leave you with a recommendation to look at Uni of Liverpool Library’s Instagram account - however good our numbers are I know theirs will be astronomically better! They’re really good at this stuff, and you’ll find them @livunilibrary.


Interested in Instagram training for your library or cultural org? Details of my social media workshops here.

Book Takeaway and User-Focused Delivery

Having not presented at a conference for two and a half years, I recently presented at two in a week!

In June I wrote about the Rough Edges and Risks talk I did on library social media for a UK event; a couple of days later I presented on my place of work’s user-centred response to the pandemic, for a US event: NEFLIN’s conference. Because of my incredibly unreliable blogging schedule, it’s taken me two additional months to write about this one…

First off here are the slides.

For this presention I was specifically asked to talk about University of York Library and the things we’ve done since March 2020. The slides above detail our Book Takeaway service, social media response, study space bookings and many other things in a timeline.

I’m incredibly proud of York and our response - the trouble with writing or talking about it is it just sounds like platitudes. ‘Incredibly user focussed’ is such a buzz-wordy phrase but that’s what we were and are. I enjoyed the chance to talk about the way in which we managed to deliver some amazing services during the height of the pandemic, whilst still prioritising staff well-being - it CAN be done.

You can see the presentations from all previous conferences on the Past Talks & Workshops page.

Risks and Rough Edges: Building Genuine Relationships Through Library Social Media

Here we are with another regular blog-post, following on from the last one a mere [checks notes] 418 days ago!

I was recently invited by Royal Holloway to present at an event they were organising on academic library social media. RH themselves were also presenting, as were representatives from MMU and Liverpool Uni Libraries. The other presentations were all great (see below) and I learned a lot.

My presentation was about the work we do at University of York Library, and in particular how we’ve seen a monumental spike in social media engagement over the last 18 months or so. The slides are here.

The whole thing was recorded on Zoom so if you’d rather you can see and hear the slides here:

The video above starts from my talk, but I’d really recommend checking out the Nathalie Rees’s talk on MMU, Patrick Walker and our host Greg Leurs’s talk on Royal Holloway, and Amy Lewin’s talk on Liverpool University too.

It was great to hear talks from four different libraries with four varying approaches (I felt we at York had the most in common with Liverpool but everyone came at it slightly differently. There were so many conferences and events centering on social media a few years ago but you don’t get so many now - it’s still a really key issue though!

Thanks again to Greg for inviting me to present.

How to post to Instagram from a PC

Posting to Insta is officially mobile-only, and the desktop version doesn’t have the button to add media. But it’s relatively straightforward to trick your desktop into displaying a mobile view, and then you can post from it directly.

There’s a million articles online about using Instagram from a PC or laptop but they’re all ludicrously complicated or involve using third-party apps etc - none of that is necessary, if you follow the steps below. (The screenshots are from Google Chrome but you can do more or less the exact same thing in Firefox.)

1) Go to instagram.com on your PC, and log in

2) Right click anywhere. You’ll see Inspect listed at the bottom of the menu which appears: click that

Log-in to Insta, right-click, and choose Inspect from the menu

Log-in to Insta, right-click, and choose Inspect from the menu

3) You’ll see the html on the right of the screen. At the top of that there’s an icon showing a phone and a tablet - if you hover over it you’ll see it’s called Toggle device toolbar. Click this: the rest of the screen will then display the website on a mobile view. At the top of the screen you’ll see a drop-down menu which allows you to choose what kind of device you want to simulate, so you can choose an iphone or whatever else you want

Choose a mobile device: Chrome will show Instagram as it would appear on that device

Choose a mobile device: Chrome will show Instagram as it would appear on that device

4) Now for the absolutely key bit (thank you to my colleagues Hannah and Antonio for getting me up to speed on this part!): refresh the browser using F5 or the Reload page button. You’ll then see the crucial button, missing until now, that you get on your phone: the + in a square which represents ‘Add picture / video’. Pressing it on your PC will open up the usual file explorer, allowing you to navigate to the media of your choice.

Refreshing the website brings up the Add Media button, highlighted in yellow here

Refreshing the website brings up the Add Media button, highlighted in yellow here

5) Choose a Filter if you like, press Next, add your caption, location, tagged people (and in Advanced Settings you’ll find the option to add Alt Tags too) and click Share to post to Instagram.

Why would you want to use Instagram on your desktop in the first place?

This technique is useful for three main reasons in my experience.

The first and most important thing is, Instagram is such a key social media tool for organisations, but not everyone wants organisational accounts on their personal phone. I work with people who’d rather not mix those two worlds and I completely understand that - but I want them to be able to contribute to our Instagram account without having to compromise their principles! This method means everyone can get involved.

The second reason is, if you already have photography on your hard-drive or network drive, it saves having to get that onto your mobile device’s camera roll.

The third thing is, you can write the post at any time of day and it will stay there waiting for you to post it at the time of your choosing (unless, obviously, you close the window / tab / browser). So if you have 5 minutes to compose the perfect Insta post first thing, but don’t want it to go live till the peak time to post later in the day, you can do the work at 9am and actually post it at 3pm.

Okay that’s it. Happy posting!

Step by step: making videos with Videoscribe

In September I made a new video to introduce the Library in 60 seconds. It was designed to be played in short Induction talks, and to be embedded in various online guides. The whole thing took around 4 hours to do (albeit spread across a couple of days) and it turned out pretty well - before we go through the step-by-step process here's the video:


It was made using Videoscribe, and they just published their 'Favorite VideoScribe videos of 2019' which, it turns out not only has videos from the BBC but also from our Library! The video above being featured on their list has reminded me to complete this blog post, which has been in the Lib-Innovation drafts folder for a while...

Step 1: Script-writing 

Because we were also producing a longer virtual tour, I knew from the start this would be only one minute long. This was surprisingly non-limiting in the end: once you accept you can't go into detail on anything, it becomes quite easy to write a friendly voice-over that introduces a number of key points in quick succession. The purpose of the video was to provide an overview, help students understand the basics, and encourage them to ask for help. So a brief script was worked up with that in mind, and I shared it with a colleague for a second opinion, then with the narrators. 

I wanted Yorkshire voices for this introduction to a Yorkshire library, and I wanted people who were friendly and informal, and I wanted it to be a man and a women ideally. Happily my first choice voice-over artists (Sarah Peace from IT and Martin Philip from Academic Liaison) said yes when I asked them to do it! 


Step 2: Voice-over recording 


The hardest thing about recording narration is finding a suitable acoustic in which to record. Even small meeting rooms in our building seem to be echoey, and although the Linguistics Department does have an audio booth we can get access to, it wasn't available in our time frame. In the end we chose quite a big room that has enough in it to absorb any resonance, leaving us with an acceptable sound quality. 

I recorded my narrators on my own laptop using Audacity, a freely available audio-editing tool, and an entry-level Blue Snowball mic I use for webinars. It took 40 minutes to record both this script and the Virtual Tour script, and the main issue was making sure the narrators were close enough to the mic. 

Audacity is incredibly simple to use. You can zoom right in on the visual representation of the audio-waves and easily identify what talking and what is not - for example, in-breaths before a word. Breaths and pauses can be selected, highlighted, and deleted. For this reason, there was absolutely no need to aim for a perfect take of the narration. Each narrator took their time delivering their section, re-running any sentence they weren't happy with. It then took me perhaps 20 minutes to edit the audio into one seamless narration, and export it as an MP3 file to add to the video.
The audio for the voice-over, as displayed by Audacity


Step 3: Creating the video with Videoscribe 

The process of creating a video with this software is to add objects to the canvas (a little bit like you might with Prezi) and then decide how they are animated, and when. So for example you can just type text in and have a hand or pen 'write' the text at the speed of your choosing, or you can add photographs which can either be 'drawn' or pushed into frame by a hand, or just appear. You put all this together, add music and a voice over you if you wish, and you have a video.

I've tended to always build towards a final picture that includes everything the viewer has just seen - so you see each section as it's added, and then at the end you zoom out to see everything at once. But you don't have to use this approach - you can stay buried in the detail if that helps you tell your story.

The VideoScribe interface looks like this:


The main part of the screen displays everything that will appear in the video, but the boxes along the bottom are how you dictate when objects arrive, how they enter the video, and in which order.

Here's a closer shot of that:


All those icons - the phone, the thumbs up, the wifi symbol etc - are from VideoScribe itself. There's also some writing, and (in the middle) a screengrab of the library catalogue.

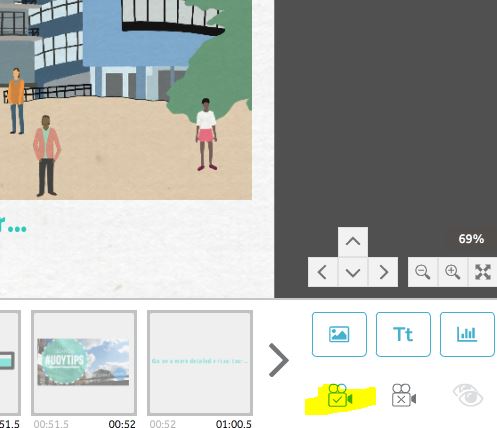
Absolutely key to a good VideoScribe video, in my experience, is the 'Set Camera to Current Position' button I've highlighted here:


This allows you to control what the camera sees, meaning you can have multiple objects in the frame at once. For example at the end of the video there's a big smiley face and the #UoYTips text added: by default the camera would zoom in so these filled the frame, meaning you could only really see them. But by setting the camera to the same position for the last three sections of the video, you get to see the entire library map, AND the smiley face / #UoYTips in the same shot.

The whole process of creating the video took around 2 hours: trust me, this is REALLY quick for making video content!

Step 4: Exporting to YouTube 

I exported two versions of the video: one directly to YouTube, and one as an MP4 file to embed directly into the Induction PowerPoint presentation me and my colleagues would be using throughout the first week of term. 

With the YouTube version there was probably around half an hour of faffing involved - writing the description, title, all the keywords, and so on, and editing the subtitles. YouTube's auto-generated subtitles are actually pretty good, but they contain no punctuation or capitalisation and sometimes get names or other words wrong - in screenshot below you can see it says 'you can get health and advice' which I had to edit to 'help and advice':


It's a relatively quick job and of course well worth doing to make sure your video is accessible. 

If you've watched the video above you'll have seen that the narration ends at least 10 seconds before the end - this is because I wanted space to link to another video (the more detailed virtual tour), a clickable thumbnail of which appears in the bottom left of the screen. This was achieved by inserting in YouTube itself, via the End Screens menu. As you can see below, the video itself is designed to receive the thumbnail in that exact position, with the arrow pointing to it. 


One final piece of admin was to create a custom Thumbnail for the Library Minute video itself. YouTube auto-generates three for you - normally none of them quite work as an encapsulation of the video, so you have to make your own (either from scratch or, more often in my case, just by taking a screenshot of the video at the best possible moment).


Step 5: Promotion

Even though the video is a piece of marketing, it still needed to be marketed... I saved a version for adding to Induction slides, and then created a slide in which it was embedded for everyone to add to their presentations.

We also tweeted it, put it on Instagram (where it did much less well than I expected, interestingly) and embedded it on key web pages such as our Info For New Students page.

And that's it! Videoscribe is a tool which we pay for on an annual basis - we don't often do this with so many great free tools available, but we feel it's worth it in this case. If you have any questions about the software or the video above, let us know in a comment...